
Ultimate Guide to Wedding Seating Charts
Ultimate Guide to Wedding Seating Charts
Planning a wedding seating chart is essential for a smooth and enjoyable reception. It ensures guests feel comfortable, vendors stay organized, and the event flows seamlessly. Over 70% of U.S. couples with 50+ guests create seating charts to avoid confusion and enhance the guest experience. Key considerations include:
Guest Comfort: Assign seats to avoid awkwardness and foster engaging conversations. Strategically place guests with shared interests and accommodate special needs (e.g., elderly, families with children).
Venue Layout: Analyze the space to optimize seating, traffic flow, and sightlines for key moments (e.g., speeches, dancing). Tools like Social Tables can help visualize layouts.
Vendor Coordination: Caterers, planners, and DJs rely on the seating chart for meal service, event timing, and identifying VIPs.
Finalize your chart 3–4 weeks before the wedding, share it with vendors, and prepare day-of materials like escort cards or a seating display. Whether hosting at a venue like Fire House KC or elsewhere, a well-planned seating chart is key to an organized and welcoming celebration.
Understanding Your Venue and Floor Plan
Before diving into seating arrangements, take a step back and get familiar with the space where your reception will unfold. The layout of your venue impacts everything from the number of tables you can fit to where guests naturally gather. Reviewing the floor plan is key to understanding how to make the most of the space.
Analyzing the Venue Layout
Start by requesting a detailed floor plan from your venue. This should include dimensions, locations of electrical outlets, restrooms, kitchen access points, and any architectural features like columns or alcoves that could affect table placement.
If you're hosting your event at Fire House KC, ask for documentation of the main hall’s dimensions, the layout of the outdoor courtyard, and how these spaces connect. With its historic 1930s fire station charm, Fire House KC features exposed structural elements, varying ceiling heights, and crystal chandeliers - details you’ll want to highlight in your setup.
Identify key elements first. Decide where major features like the dance floor, DJ or band, bar, cake table, gift table, and photo areas will go. These anchor points shape the flow of the room. For example, avoid placing the cake table near restrooms or the dance floor in a way that blocks guest movement.
Think about traffic flow. Walk through the venue to trace the paths guests will naturally take. Ensure there’s at least 36 inches of clearance between tables for smooth movement and accessibility. Keep tables away from high-traffic areas like the bar or kitchen access points so guests can enjoy their meals without interruptions. Fire House KC’s team can offer advice on typical guest flow patterns based on their experience.
Sightlines matter. Every guest should be able to see key moments like speeches, the first dance, or other entertainment. Avoid placing tables behind columns or in corners where guests might feel left out. If Fire House KC’s main hall has natural focal points, such as architectural features or chandeliers, arrange seating to take advantage of those views.
Account for climate control. Check which areas of the venue are climate-controlled, especially if you plan to use the outdoor courtyard during warmer or cooler months. If both indoor and outdoor spaces are part of your plan, ensure there’s a natural flow between them.
Leverage digital tools. Platforms like Social Tables or WeddingWire’s seating chart tool let you upload Fire House KC’s floor plan and experiment with different layouts. These tools make it easy to visualize your options and share drafts with your partner, family, or Fire House KC’s event coordinator for feedback.
Zones and Layout Options for Fire House KC
Once you understand the venue’s layout, you can start creating zones that enhance the guest experience. Fire House KC offers multiple spaces - the main hall, outdoor courtyard, ceremony room, and bar - giving you flexibility, but it’s important to plan carefully so guests can move smoothly between areas.
The main hall is your central reception space. With a capacity of up to 150 guests, this is where most couples focus their dining and dancing. You have several layout options: a traditional setup with a head table facing the dance floor, a sweetheart table blended among guest tables for a cozier vibe, or a cocktail-style arrangement with a mix of standing and seated tables.
Position the dance floor so it’s visible from most tables but doesn’t block paths to the bar or restrooms. Arrange tables to highlight the chandeliers, ensuring guests don’t have their backs to these stunning features. Work with Fire House KC’s team to determine how many tables fit comfortably, leaving at least 2-3 feet of clearance around each for chairs and movement.
The outdoor courtyard offers flexibility. Many couples use this space for cocktail hour before transitioning guests to the main hall for dinner. The courtyard’s café lighting and open-air ambiance make it ideal for mingling. You could also use it for overflow seating or set up high-top cocktail tables as a lounge area where guests can take a break from dancing.
Always have a backup plan in case of weather changes. Communicate with Fire House KC about how quickly cocktail hour can move indoors if needed. The courtyard works best as a supplementary space rather than the main dining area unless your guest list is small.
The exclusive ceremony room needs separate planning. If you’re holding your ceremony at Fire House KC, think through how guests will transition from the ceremony to cocktail hour and then to the reception. Clear signage and a logical flow ensure guests naturally move from the ceremony room to the courtyard for cocktails and then into the main hall for dinner and dancing.
The bar is a natural gathering spot. If the bar has a fixed location, arrange nearby tables to accommodate guests who want to stay close to the action. However, avoid seating your quieter guests right next to the bar area. Make sure catering staff can easily move between the prep kitchen and guest tables without navigating through crowded bar areas.
Create distinct zones within the main hall. Divide the space into functional areas: a dining zone for tables, a dance floor zone, and a mingling zone near the bar or lounge furniture. This helps guests intuitively understand the layout and gravitate toward the activity they’re most interested in - whether it’s eating, dancing, or chatting with friends.
When dividing Fire House KC’s spaces into zones, think about the flow of the evening. Early on, guests will focus on the courtyard and dining areas. As the night progresses, the dance floor and bar become the main attractions. Your table placement should support this natural progression.
Work closely with Fire House KC’s team. Their on-site representatives have seen countless events and can offer valuable advice on what works best. Schedule a consultation to review your preliminary floor plan, discuss your vision, and address any challenges or opportunities specific to the venue. They can also point out areas that need to remain clear for safety or operational reasons and ensure your layout meets accessibility standards.
Be sure to share your seating chart draft with Fire House KC’s team at least three to four weeks before your wedding. This gives them time to review it, flag potential issues, and coordinate with other vendors. Their input will help ensure your seating plan is both practical and visually appealing.
Building the Guest List and Seating Strategy
Once your venue layout is sorted, it's time to focus on your guest list and seating assignments. This stage is crucial because a well-organized guest list lays the groundwork for a smooth seating arrangement. Think of it as a living document that adapts as RSVPs come in and details evolve.
Organizing Your Guest List
Start building your guest list early and keep it organized. A spreadsheet works wonders here - include columns for full names, mailing addresses, RSVP status, wedding party roles, and seating assignments.
To make things even easier, group your guests by their relationship to you. Use tags like "Bride's immediate family", "Groom's immediate family", "Mutual friends", "College friends", "Work colleagues", or "Childhood friends." These categories help you filter your list and naturally group guests for seating.
Don’t forget to track special needs and preferences. Add columns for age groups (child, teen, adult, senior) and note dietary restrictions like vegetarian, vegan, gluten-free, or allergies. Highlight accessibility needs, such as wheelchair access or proximity to exits and restrooms. A "notes" column can capture other important details, like guests who should sit together - or apart.
As RSVPs roll in, usually about three to four weeks before the wedding, start grouping guests into smaller "pods" of families, couples, or friend groups. This approach simplifies seating and keeps social bonds intact. Update your list by removing declined RSVPs, fixing any errors, and standardizing names for couples and families. Always leave room for last-minute changes by keeping a few flexible groups that can handle additions or cancellations.
Once your guest list is polished, you’re ready to choose a seating style that fits your event.
Choosing the Right Seating Style
Your seating arrangement can shape the vibe of your reception and influence how smoothly everything flows. The three main options are assigned seating, assigned tables, and open seating.
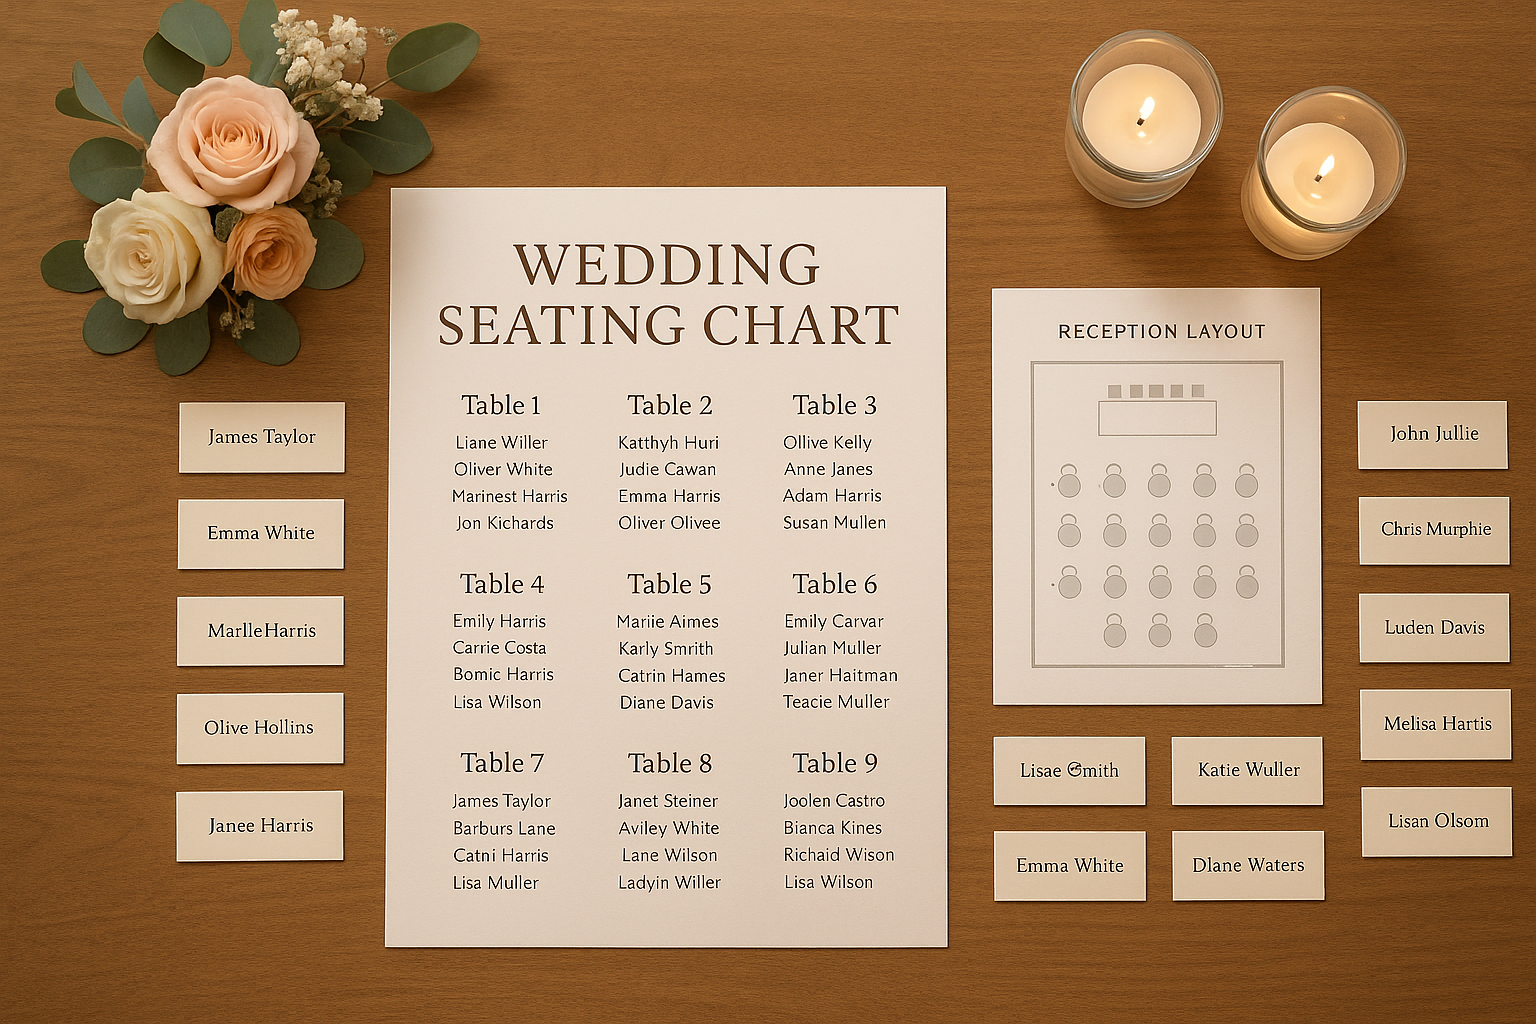
Assigned seating gives each guest a specific seat, complete with a place card. This option offers maximum control over social dynamics, dietary needs, and accessibility requirements. While it’s more time-intensive and requires clear signage, it prevents confusion - especially for larger weddings.
Assigned tables offer a middle ground. Guests are assigned a table but can pick their own seats. This method simplifies planning while still giving families and friend groups an easy way to find their spots. However, you’ll have less control over who sits next to whom.
Open seating creates a relaxed, casual atmosphere. It’s ideal for small or informal weddings, but can lead to uneven table groups and confusion about where to sit.
Here’s a quick comparison to help you decide:
| Seating Style | Ideal For | Pros | Cons |
|---|---|---|---|
| Assigned seats | Formal, plated dinner, 75–150+ guests | Ensures order, meets all needs, maximizes service efficiency | Most time-consuming to plan; requires name/place cards |
| Assigned tables | Semi-formal, buffet/family-style, 50–150 guests | Balances structure and flexibility; simpler planning | Less control over exact pairings; some tables may fill unevenly |
| Open seating | Casual, small weddings, cocktail receptions | Minimal prep; relaxed atmosphere | Can lead to confusion, “seat saving,” and uneven table distribution |
Think about your guest list and the style of service when making your decision. Larger weddings, formal dinners, or events with guests who need extra assistance often benefit from more structure. For example, if your venue has multiple spaces - like Fire House KC - your seating plan can help balance the flow between the main hall, ceremony area, courtyard, and bar. Choose a style that supports your event’s flow while accommodating family dynamics and special needs.
Special Considerations and Etiquette
When planning seating, guest comfort and etiquette should guide your decisions. Some situations, like family dynamics or special requirements, call for extra attention.
If divorced or estranged parents are attending, prioritize their comfort. If both have new partners, consider seating them at separate but equally prominent tables near the head table. If relationships are amicable, they might share a larger family table, but avoid seating them directly next to each other unless everyone is comfortable with that arrangement.
For children, seating depends on their age and needs. Young children (under seven) are usually best seated with their parents for easier supervision. Older kids who can sit independently might enjoy a designated children’s table. This setup keeps them nearby while offering age-appropriate activities to keep them entertained.
Designing the Table Layout and Guest Placement
With your guest list finalized and a seating style in mind, it’s time to map out a layout that balances style, flow, and comfort. The way you arrange tables and place guests can greatly influence the atmosphere and functionality of your reception. Let’s dive into selecting the right tables and planning an efficient floor layout.
Selecting Table Types and Sizes
The shape and size of your tables do more than just contribute to the décor - they affect how guests interact, how much space you need, and the overall vibe of your event. Here are the most common options to consider:
Round tables: These are a classic choice for formal receptions. A 60-inch round table comfortably seats 8 guests, while a 72-inch round can accommodate 10–12. The circular design promotes conversation since everyone can see each other, and they’re easy to arrange symmetrically in most venues.
Rectangular (or farm) tables: Perfect for creating a communal, banquet-style feel, rectangular tables work well in rustic or industrial spaces. A 6-foot table seats 6–8 guests, and an 8-foot table fits 8–10. These tables can be arranged end-to-end for striking rows, but you’ll need to leave 4–5 feet between rows for smooth movement.
At Fire House KC, the historic charm of the venue pairs beautifully with farm tables. The exposed brick, vintage furniture, and crystal chandeliers enhance the communal ambiance. Work with the Fire House KC team to ensure your layout maximizes the space while respecting emergency exits and service routes.
Sweetheart table: This smaller table is reserved for the couple, offering a private space to enjoy your meal while remaining a focal point of the reception. Whether round or rectangular, it’s a great way to save space for additional guest tables or a larger dance floor.
When choosing table shapes, think about your guest count, the venue’s dimensions, and your service style (plated, buffet, or family-style). Round tables lend a traditional feel, while long tables create a more modern, communal setting. Mixing shapes can also work well in unique spaces, adding visual variety.
Planning the Floor Layout
Once you’ve picked your tables, it’s time to arrange them. Start by requesting a scaled floor plan from your venue that includes room dimensions, fixed features like columns and windows, and locations of doors, restrooms, and power outlets. With this map in hand, you can begin placing key elements:
Dance floor: Position this centrally or in a spot where most guests can see it, ensuring it doesn’t block pathways to exits or restrooms.
DJ or band: Place them near the dance floor with access to outlets, but be mindful that their setup doesn’t obstruct doors or key areas.
Bars and food stations: These should be accessible but not at entry chokepoints. Keep food and cake tables away from restrooms.
Head or sweetheart table: Position this so the couple is visible from most tables - often against a focal wall or near the dance floor. At Fire House KC, placing the sweetheart table near exposed brick or under vintage chandeliers creates stunning photo opportunities without disrupting walkways or access to the outdoor courtyard.
Guest tables: Arrange these around the major focal points, leaving at least 4–5 feet between rows for easy movement. Keep tables a few feet back from the dance floor to avoid disruptions while still offering clear views of key moments. For farm tables, leave cross-aisles every few rows for seamless access to bars, restrooms, and exits.
Digital tools like Social Tables, WeddingWire, Zola, and Wedding Planning Assistant can help you experiment with layouts. Once you’ve finalized your plan, share it with the Fire House KC team, your caterer, and your DJ about a week or two before the event.
Placing Guests at Tables
With your guest list organized, it’s time to assign seating. Start with the most important placements:
Wedding couple and wedding party: Decide on a sweetheart or head table, then seat the wedding party at nearby tables to keep them close.
Immediate family and VIPs: Parents, grandparents, close relatives, and the officiant should sit near the head table with clear sightlines to the couple and dance floor.
Other guests: Group guests by categories like college friends, work colleagues, childhood friends, or extended family. Avoid isolating single guests by mixing them with couples or friendly groups.
Balance each table by considering personalities, ages, and energy levels. Mixing talkative and quieter guests can encourage natural conversations. For elderly guests, choose quieter spots near exits or restrooms, and ensure step-free access for those with mobility challenges. Make note of dietary restrictions for your caterer.
Number your tables logically based on how guests will enter the room, and provide a seating chart or escort cards at the entrance. If Fire House KC’s layout spans multiple areas, such as the main hall and outdoor courtyard, consider including a small floor-plan-style sign to help guests navigate.
Once seating is finalized, share the chart with your venue, caterer, planner, and DJ. Thoughtful seating and a well-planned layout will ensure your reception feels welcoming and organized, creating a seamless experience for everyone.
Finalizing and Communicating the Seating Chart
Finalizing your seating chart is a crucial step in ensuring your reception runs smoothly. From guest comfort to vendor coordination, every detail matters. Once you've organized your guest list, chosen a seating layout, and assigned tables, it's time to lock everything in and share the information with everyone involved - whether it's the Fire House KC team, caterers, or other vendors.
Proofing and Timeline
Start drafting your seating chart about 6–8 weeks before the wedding as RSVPs roll in. This gives you a framework to refine as more responses come in. By 4–5 weeks out, aim to have a working version that includes most guest details, such as meal choices and accessibility needs.
Plan to finalize your seating chart 2–3 weeks before the wedding, aligning with venue and caterer deadlines for headcounts and meal orders. By 7–10 days before the event, you should have a print-ready version after confirming any last-minute changes. Allow an extra 2–3 days for adjustments or reprints to avoid surprises.
During proofing, double-check every detail:
Ensure guest names are spelled correctly, including titles and suffixes.
Verify table numbers are unique, and guest counts align with venue guidelines.
Attach dietary notes and meal preferences to the correct guests for the caterer.
Mark special seating needs, like wheelchair access or VIP tables.
Confirm the chart matches the venue's floor plan and any digital versions (PDF or spreadsheet).
Check Fire House KC’s specific deadlines for final headcounts (e.g., "final count due 10 days before") and work backward. Set RSVP deadlines at least 3–4 weeks before the wedding, follow up with non-responders within a few days, and block time to finalize and proof the chart 2–3 weeks before the event. This ensures you’ll meet vendor deadlines and still have time for printing escort cards and signage.
| Task | Timing Before Wedding | Who Needs It |
|---|---|---|
| Final guest list & RSVPs | 3–4 weeks | Couple, planner |
| First full seating draft | 2–3 weeks | Couple, planner |
| Final seating chart & layout | 7–10 days | Fire House KC, caterer, rentals |
| Printed day-of materials | 3–7 days | Stationer, planner, venue staff |
| Last-minute adjustments | 0–3 days | Planner, venue, catering captain |
Once finalized, distribute the chart to all key vendors promptly.
Collaborating with Fire House KC and Vendors
After finalizing your seating chart, share it with everyone who needs it. Start by getting Fire House KC’s official floor plan for the main hall, outdoor courtyard, and ceremony room. This plan should include the maximum table capacity for your guest count (up to 150), layout recommendations, and any guidelines for traffic flow or fire-code pathways.
Provide the final chart to Fire House KC, your caterer, DJ, planner, and photographer. Share both a PDF and a spreadsheet version for flexibility. The caterer will need a table-by-table headcount, meal selections, and dietary notes. The DJ or band should know where the dance floor, speakers, and key tables are located. Your photographer can use the chart to identify seating for VIPs and family members during toasts or special moments.
Highlight special cases on the chart:
Kids’ tables or high chairs
Dietary needs or allergies
Wheelchair or scooter seating
VIP or family tables
Complex family arrangements
For Fire House KC’s multi-space setup, include separate diagrams if guests will move between areas, such as from the ceremony room to the reception hall.
Determine who at Fire House KC will handle day-of table changes or resets, and agree on how to deliver updates - whether via email, printed diagrams, or both. Having a single point of contact reduces confusion and ensures everyone works with the same information.
Reserve a few flexible seating spots to handle last-minute changes. Leave one or two open seats at non-family tables to accommodate cancellations or late additions without reworking the entire chart. Share an updated version - with changes clearly marked - with Fire House KC and your planner to keep everyone on the same page. On the wedding day, designate someone (your planner or a trusted friend) to carry a labeled printout and a pen for real-time updates. This avoids confusion and ensures smooth communication with the catering and venue teams.
Creating Day-of Materials
Day-of materials play a key role in helping guests find their seats and providing clear guidance for staff and vendors. The most common options include escort cards, place cards, seating chart displays, and printed layouts.
Escort cards: These list guest names and table numbers and are displayed near the entrance. They guide guests to their table without assigning specific seats.
Place cards: These are set at each place setting and assign exact seats, ideal for plated dinners or formal weddings.
Seating chart displays: Large displays (on easels, mirrors, or boards) alphabetized by last name offer a quick visual reference. These can complement or replace escort cards.
Printed layouts: These are primarily for staff and vendors, showing the full floor plan and seating arrangement for easy reference during setup.
Use large, high-contrast fonts and group names alphabetically by last name to make guest lookup quick and easy. Consider grouping letters (e.g., A–D, E–H) to reduce congestion at the entrance. For Fire House KC’s multi-space layout, include clear directional cues like “Courtyard tables 1–6, Main Hall tables 7–15” to help guests navigate. Use sturdy materials like laminated or thick cardstock for outdoor durability, and keep a few blank cards handy for last-minute changes.
Digital tools like Social Tables, WeddingWire, Zola, and Wedding Planning Assistant simplify the process. These platforms let you drag and drop guests into seats, generate floor plans, and export PDFs or spreadsheets for vendors. Features like tags for dietary needs or VIPs make proofing easier, and when changes arise, you can update the chart digitally and quickly regenerate escort card lists, seating displays, and layouts.
Conclusion
Creating a seating chart is a key step in crafting a comfortable and inviting atmosphere for your guests. By tackling this task methodically - confirming your guest list, understanding your venue's layout, grouping guests thoughtfully, and coordinating with your vendors - you set the stage for a reception that flows effortlessly from start to finish. Breaking the process into manageable steps transforms what might feel overwhelming into a smooth and straightforward plan.
The approach is simple: Confirm RSVPs, secure an accurate floor plan, select table types, group guests by relationships and special needs, and review the layout to ensure smooth movement throughout the space. For a venue like Fire House KC, which accommodates 150 guests, dividing the space into zones - such as the main hall, outdoor courtyard, ceremony area, and bar - helps maximize comfort and flow. Slightly underfilling tables (e.g., seating 8 at a 72" round table) allows for more breathing room and better conversation. Thoughtfully positioning key elements like the DJ, bar, and sweetheart or head table further enhances the guest experience.
Thoughtful seating arrangements also mean prioritizing the needs of your most important guests. Ensure clear pathways, ample spacing, and prime seating for VIPs, older guests, and those requiring accessibility. Balance table sizes to avoid overcrowding, and make sure close family and VIPs have clear views of the couple during speeches and special moments. These small details contribute to an event that feels well-planned and considerate.
Addressing sensitive seating issues is equally important. Avoid placing ex-partners or estranged relatives at the same table, provide elder family members with easily accessible seats, and consider assigning children to a supervised kids' table near their parents. Be mindful of single guests, arranging their seating in a way that feels inclusive, and clearly communicate any special accommodations - such as wheelchair access, interpreters, or allergy-friendly zones - with your venue and catering team ahead of time. These thoughtful touches demonstrate care and help avoid unnecessary awkwardness.
Start drafting your seating chart once most RSVPs are in, and refine it digitally as needed. Aim to finalize the chart 10–14 days before the wedding, leaving room for minor day-of adjustments. Keep one or two "flex" seats available for unexpected changes, such as last-minute declines or additional plus-ones.
Review the layout from your guests' perspective. Confirm that signage is clear, every guest has a seat, and pathways are accessible. Double-check that tables are not overcrowded, key moments like speeches and dances are visible to all, and service staff have room to navigate. Have a trusted planner, coordinator, or detail-oriented friend review the chart to catch any oversights or awkward pairings. These final checks ensure everything runs smoothly.
Finalize your seating chart using a digital tool, and share an updated version with your planner or venue representative. Designate someone you trust - such as your on-site coordinator at Fire House KC - to handle any last-minute changes, allowing you to stay focused on enjoying your big day. Remember, small hiccups will go unnoticed amidst the joy and celebration.
Lastly, consider how your seating chart display can double as decor. At Fire House KC, the industrial-historic charm pairs beautifully with creative options like framed maps, vintage door frames, or wood-and-metal signage. This turns a functional chart into a welcoming feature that enhances your guests' arrival experience while complementing the venue's unique style. With careful planning, your seating chart becomes more than just logistics - it becomes part of the celebration.
FAQs
How can I make sure my wedding seating chart is inclusive for guests with special needs or dietary restrictions?
When putting together a seating chart, it's important to think about accessibility. Make sure guests with mobility challenges have seats in convenient spots, like near entrances or along wider pathways that are easy to navigate. For dietary needs, work closely with your caterer ahead of time to arrange appropriate meal options. You might also want to subtly mark place cards to indicate special meals without drawing attention. A little extra planning can go a long way in making every guest feel welcome and at ease on your special day.
How can I handle last-minute changes to my wedding seating chart?
Last-minute tweaks to your wedding seating chart can feel overwhelming, but with a little organization and adaptability, you can handle them with ease. The best way to stay on top of changes is by keeping your seating chart in a digital format - whether that's a spreadsheet or a planning app - so you can make updates quickly and share them with your wedding team without hassle.
If a guest cancels or you need to squeeze in someone new, focus on maintaining a balanced and welcoming vibe at each table. Group people with shared interests or connections to help everyone feel at ease. To make things smoother, assign someone reliable - like your wedding coordinator or a family member - to relay updates to the venue and ensure place cards are updated as needed.
At Fire House KC, the cozy atmosphere and adaptable spaces make handling last-minute changes much simpler. Whether you're shuffling tables in the main hall or tweaking the setup in the outdoor courtyard, the venue's team is ready to step in and make sure everything goes off without a hitch.
How can I incorporate the unique features of Fire House KC into my wedding seating plan for a better guest experience?
Fire House KC offers a variety of spaces that can transform your wedding into a beautifully orchestrated event. With areas like the main hall, outdoor courtyard, ceremony room, and bar, you have the flexibility to design a seating arrangement that suits every part of your celebration. Picture hosting a formal dinner in the main hall, a lively cocktail hour in the courtyard, and an intimate vow exchange in the ceremony room.
By aligning seating arrangements with each unique space, you’ll create a natural flow for your guests while showcasing the venue’s historic charm and industrial elegance. Thoughtfully planning how to use these areas not only enhances the functionality of your event but also elevates its overall atmosphere.